If you operate a website, then by now, you’ve probably heard of SSL (Secure Socket Layer) certificates.
SSL in a nutshell
The technology an SSL certificate uses secures the data that flows between the visitor and your website’s server. This will obfuscate private information from view of hackers, information-stealing scripts, and other malicious practices, by way of encryption.
To add trust and credibility to your website, it’s most definitely crucial to have your site secured with SSL.
Why SSL is now a requirement
You may or may not be aware that maintaining a non-secured website is now practically illegal in the eyes of Google.
Google announced in fall of 2016 1 that its Chrome browser would start to alert users of websites that were not secure when attempting to browse them. After that, in order to avoid being penalized by these alerts, Google told site owners to take action to secure their sites 2 by January 2017.
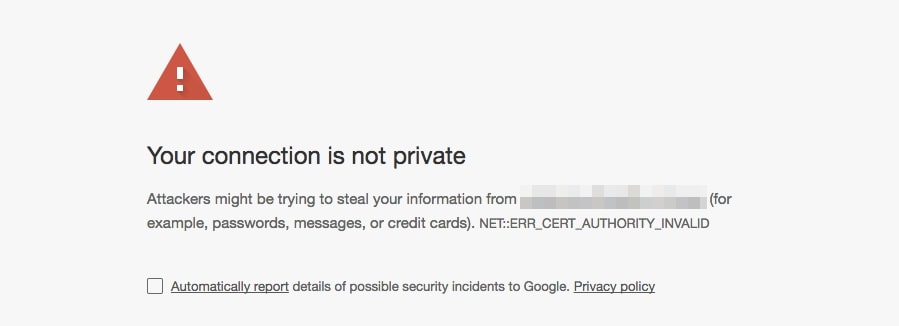
As a result, website developers around the world began making sure all their clients’ sites were secured with SSL. Some panicked, since not securing their site would mean users would likely leave their website if alerted by Google that it isn’t secure. At the end of 2016, Google began flagging about two-thirds of the websites in its index. Now, Google is starting to de-list any non-secured sites entirely.
Secure your site now to avoid problems
If you haven’t yet secured your website, it’s not too late. You can simply contact your website developer or host and ask them to add SSL certificate protection to your site right away.
But if you want to save some expense, your website host allows you to do this yourself. They’ll sell you an SSL certificate and then walk you through installing it yourself.
Even better, if you happen to use a self-hosted version of WordPress, you can save a lot hassle as well.
Let’s Encrypt is an open source initiative that provides free SSL certificates for anyone out there. This is especially easy if you are using Hostgator or Siteground, both of which fully support Let’s Encrypt. If your site is hosted by either of these, the steps below are all you need.
Following are the steps to add a free SSL to your WordPress website using Let’s Encrypt on your own, quickly:
What You’ll Need:
A. Ensure your website hosted company is supporting Let’s Encrypt: https://community.letsencrypt.org/t/web-hosting-who-support-lets-encrypt/6920#full
B. Access to your WordPress website’s Dashboard
Instructions to add free SSL to your WordPress site
Step 1. Go to WordPress > Dashboard > Plugins > Add New
Step 2. In the Search Bar, enter “Really Simple SSL” (authors: Rogier Lankhorst, Mark Wolters 3)
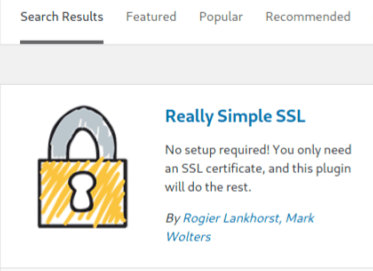
Step 3. Install and Activate the Plugin
Step 4. You should see box now asking you to enable SSL. Click the button to Activate SSL. This may log you out of WordPress once you click it.
Now, just check for the green padlock icon in your browser’s address bar next to your website’s URL that will verify “Let’s Encrypt issued the certificate”
Step 5. That’s it. In most cases, you will not have to do more changes, as long as your website host is supporting the Free SSL certificate by Let’s Encrypt.
Notes/troubleshooting:
If you receive an “unsafe mixed content” error next to the padlock in your browser’s address bar, here are some additional steps you may take, courtesy of the Really Simple SSL knowledgebase.
If you find these 5 steps were not enough to fully install the Let’s Encrypt SSL to your site using Really Simple SSL plugin, their support forum may offer some insight.
[1] https://www.searchenginejournal.com/google-is-requiring-https-for-secure-data-in-chrome/183756/#close[2] https://security.googleblog.com/2016/09/moving-towards-more-secure-web.html
[3] https://really-simple-plugins.com/